Rain Garden Gravel & Soil Mix: Depth, Layers & Volume
A properly designed rain garden can transform stormwater runoff into a beautiful and beneficial landscape feature. This guide explains what a rain garden is, how it works, which materials you need, how to design and install it step by step, and how to estimate the amount of gravel required. Whether you are managing water runoff from your roof or creating a native plant habitat, use the sections below to find what you need.
See How to Build a Rain Garden
This visual guide clearly illustrates the 7-step sequence for installing a rain garden, showing exactly when to add each material layer. By breaking down the process into numbered steps and displaying the layered cross-section from river rock to mulch, it helps homeowners understand both the installation order and the proper layer structure for optimal drainage and plant health.
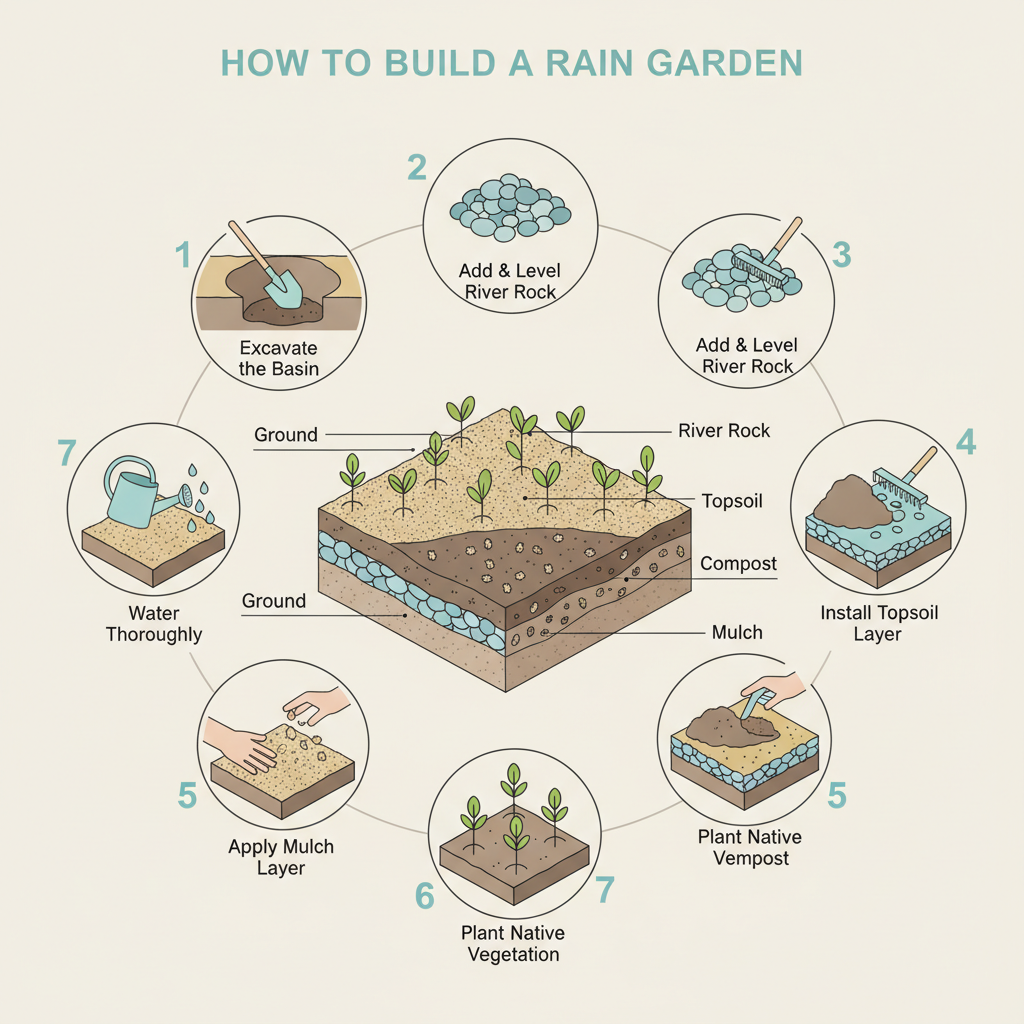
This diagram couldn't load.
Watch the video guide insteadRain Gardens for Stormwater Management: Best Materials, Depth, Size & How to Build
A rain garden is a landscaped depression designed to capture and filter stormwater runoff from roofs, driveways, and other impervious surfaces. For optimal performance, use 1-3 inch river rock as your drainage layer at 6-8 inches deep to create stable voids that prevent waterlogging while allowing proper infiltration. The gravel layer sits beneath specialized soil mixes and mulch, creating a multi-layered system that temporarily ponds water before slowly releasing it into the ground, reducing runoff and improving water quality.
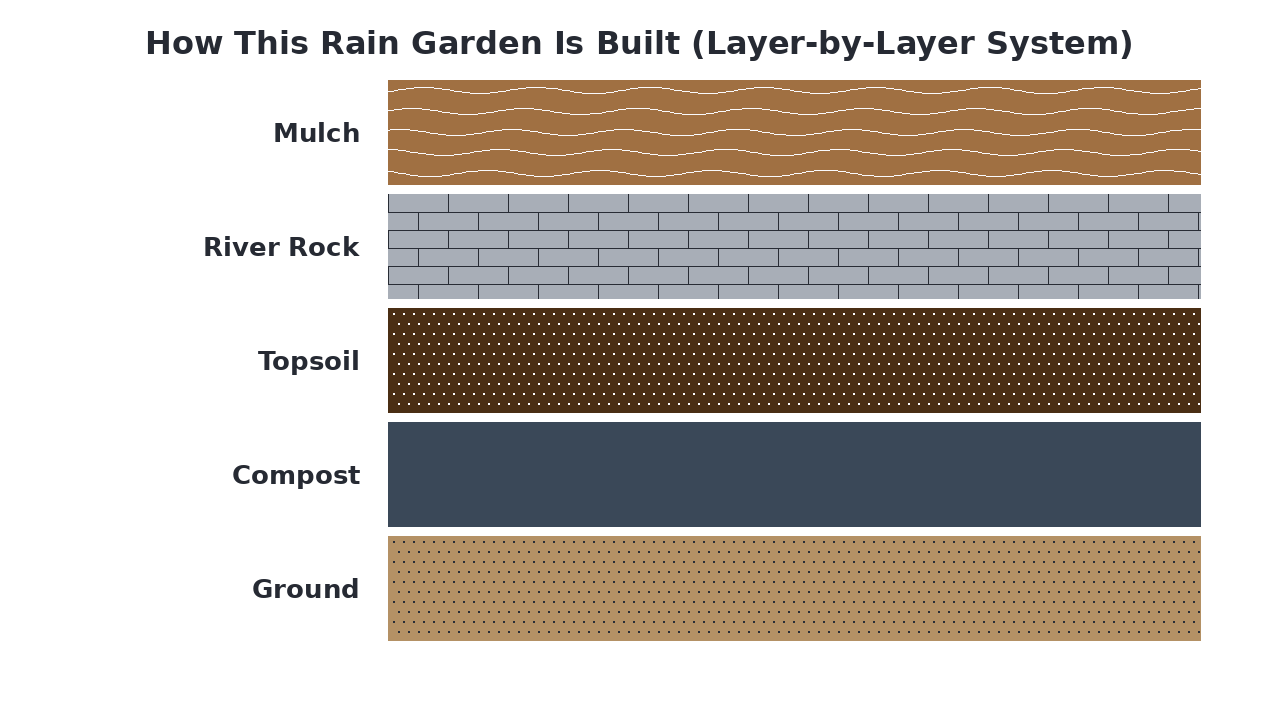
How This Rain Garden Is Built (Layer-by-Layer System)
A rain garden is a layered system designed to capture and filter stormwater runoff while supporting plant growth. It starts with a prepared subgrade, followed by a specialized soil mix that promotes infiltration and plant health, a gravel drainage layer that prevents waterlogging, and a top layer of mulch that reduces evaporation and weeds. The system slopes gently to allow water to pool temporarily before slowly infiltrating the soil, reducing runoff and improving water quality.
Materials Breakdown: What Each Layer Does
A rain garden is a layered system where each material serves a distinct purpose to manage stormwater effectively. The components work together to capture runoff, filter pollutants, and allow water to infiltrate slowly into the ground. Selecting the right product for each layer ensures the garden functions properly, reduces erosion, and supports healthy plant growth.
Native Soil
The existing soil that forms the base of the rain garden; its composition affects drainage and water-holding capacity.
Compost
Organic matter that enriches the soil, improves water retention, and provides nutrients for plants.
View Compost →Topsoil
A nutrient-rich soil layer that supports plant roots and helps with initial water infiltration.
View Topsoil →River Rock
Smooth stones that create a permeable surface, allowing water to pass through while preventing erosion.
View River Rock →Mulch
A protective layer that suppresses weeds, retains soil moisture, and reduces surface runoff.
View Mulch →What Is a Rain Garden and Why Does It Matter?
A rain garden is a shallow depression planted with native vegetation that captures stormwater runoff from impervious surfaces like roofs and driveways. It matters because it reduces flooding, filters pollutants, recharges groundwater, and creates habitat—unlike traditional drainage that simply moves water away. Unlike a French drain that pipes water elsewhere or a swale that merely channels runoff, a rain garden actively treats and infiltrates water on-site through layered filtration systems.
Common Types of Rain Garden Systems
Rain gardens vary mainly in their construction materials and planting approaches. The simplest type uses native soil with minimal amendments, while more engineered versions incorporate specialized filtration layers like gravel beds or underdrains. The choice depends on your site's drainage capacity, budget, and desired maintenance level.
- Uses existing soil
- Lowest cost option
- Minimal excavation needed
- Best for well-draining sites
- Simplest installation process
Best for: Well-draining soils with tight budgets
- River rock drainage layer
- Excellent water infiltration
- Reduces soil compaction
- Filters pollutants effectively
- Long-lasting performance
Best for: Most residential applications needing reliable drainage
- Specialized filtration media
- Underdrain systems included
- Highest performance level
- Professional installation required
- Most expensive option
Best for: Commercial sites or challenging drainage conditions
- Organic mulch surface
- Good for plant growth
- Needs regular replenishment
- Natural aesthetic appeal
- Moderate filtration capacity
Best for: Garden-focused designs with lower runoff volumes
When a Rain Garden Is the Best Solution
A gravel-filter rain garden is ideal when you need reliable stormwater management without breaking the bank. It's perfect for typical residential lots with moderate runoff from roofs or driveways, where you want both effective drainage and attractive landscaping. Choose this option when you need lasting performance with minimal maintenance, especially in areas with clay soils that need improved infiltration.
Everything You Need to Build a Rain Garden
Building a rain garden requires specific materials for its layered structure and basic tools for excavation and shaping. You'll need foundational materials like compost and topsoil to improve soil quality and support plant roots, plus surface materials like river rock and mulch for drainage and aesthetics. Essential tools include shovels for digging, a wheelbarrow for moving materials, and a level to ensure proper slope.
- Compost, Topsoil, River rock, Mulch
- Shovel, Wheelbarrow, Level, Rake, Gloves
- Hello Gravel (river rock, compost, mulch), Home Depot (tools), A contractor supply store (level)
What to Consider Before You Start
Before you break ground, a few key considerations will ensure your rain garden functions effectively and integrates well with your property.
- Site location and drainage
Identify a low spot in your yard where water naturally collects or where downspouts can be directed, ensuring it's at least 10 feet from your home's foundation.
- Soil infiltration test
Perform a percolation test by digging a hole and filling it with water to see how quickly it drains, confirming your soil is suitable for a rain garden.
- Local regulations and utilities
Check with your local municipality for any permits required and call 811 to have underground utility lines marked before you dig.
- Garden size and shape
Determine the appropriate dimensions and depth based on your roof area and soil type to handle expected stormwater runoff.
- Plant selection
Choose native, water-tolerant plants that can handle both wet and dry conditions and are appropriate for your climate zone.
How to Prepare the Ground for a Rain Garden
Begin by clearing the area of all vegetation, rocks, and debris. Mark the rain garden's outline with spray paint or stakes, then excavate to create a shallow basin with gently sloping sides. Grade the bottom to be level and ensure the soil is firm but not overly compacted to allow for proper infiltration.
How a Rain Garden Works
A rain garden captures stormwater runoff from roofs or driveways, directing it into the layered basin. As water percolates down, the topsoil and compost layers filter pollutants while plant roots absorb nutrients. The river rock layer at the bottom aids drainage, and the mulch top layer reduces evaporation and suppresses weeds, allowing clean water to slowly infiltrate the native soil below.
How to Install a Rain Garden
Excavate the Basin
Dig out the marked area to a depth of 6 to 12 inches, creating a shallow depression with gently sloped sides.
Add & Level River Rock
Place a 2 to 3-inch layer of river rock across the bottom of the basin to create a drainage layer.
Install Topsoil Layer
Spread a 6 to 8-inch layer of topsoil over the river rock, ensuring it is level and gently sloped toward the center.
Mix in Compost
Incorporate a 2 to 3-inch layer of compost into the topsoil to improve nutrient content and water retention.
Plant Native Vegetation
Install water-tolerant native plants, spacing them appropriately and planting at the same depth as their containers.
Apply Mulch Layer
Spread a 2 to 3-inch layer of mulch around the plants to conserve moisture, suppress weeds, and protect the soil.
Water Thoroughly
Soak the entire rain garden deeply to settle the soil layers and help establish the new plants.
Alternative Gravel Options for Rain Gardens
While pea gravel and river rock are popular decorative choices, they are not ideal for the primary infiltration layer of a rain garden due to poor compaction and limited void space. For effective water management, a well-graded aggregate like #57 stone provides the necessary permeability and structural support. Crushed concrete offers a recycled, cost-effective alternative with good drainage, and decomposed granite can work in drier climates, but #57 stone is generally the best choice for its balance of function, availability, and performance.
The best overall choice for the main drainage layer due to its excellent permeability and stability.
View Product →A decorative surface option that allows some infiltration but compacts poorly for primary drainage.
View Product →Large, smooth stones suitable for decorative mulch or channel lining, not for the core infiltration bed.
View Product →A budget-friendly, recycled aggregate that provides good drainage for the base layer.
View Product →A poor choice for drainage layers as it compacts easily and severely restricts water flow.
View Product →Common Rain Garden Mistakes (And How to Avoid Them)
A well-designed rain garden effectively manages stormwater, but common installation errors can lead to poor drainage, plant failure, or even property damage. Avoiding these pitfalls ensures your garden functions properly for years.
- Insufficient depth
- Poor soil mix
- Wrong plant selection
- Inadequate overflow
- Clogged inlet
How to Maintain a Rain Garden
Regular maintenance keeps your rain garden functioning optimally. Inspect and clear the inlet and overflow areas of debris after heavy storms to prevent blockages. Annually, check for erosion around the basin edges and replenish mulch to suppress weeds and retain moisture. Every few years, you may need to aerate compacted soil in the planting bed and divide overgrown plants to maintain healthy infiltration.
Calculate How Much Gravel You Need
Enter Your Dimensions
Measure your project area and we'll calculate how much material you need.