Dry Well Gravel Capacity: Sizing, Depth & Tons Needed
A properly planned dry well is essential for effective water drainage and preventing foundation damage. This guide explains what a dry well is, which materials you need, how to design the optimal layout, how to install it step by step, and how to estimate the amount of gravel required. Whether you are tackling backyard flooding or planning a new drainage system, use the sections below to find what you need.
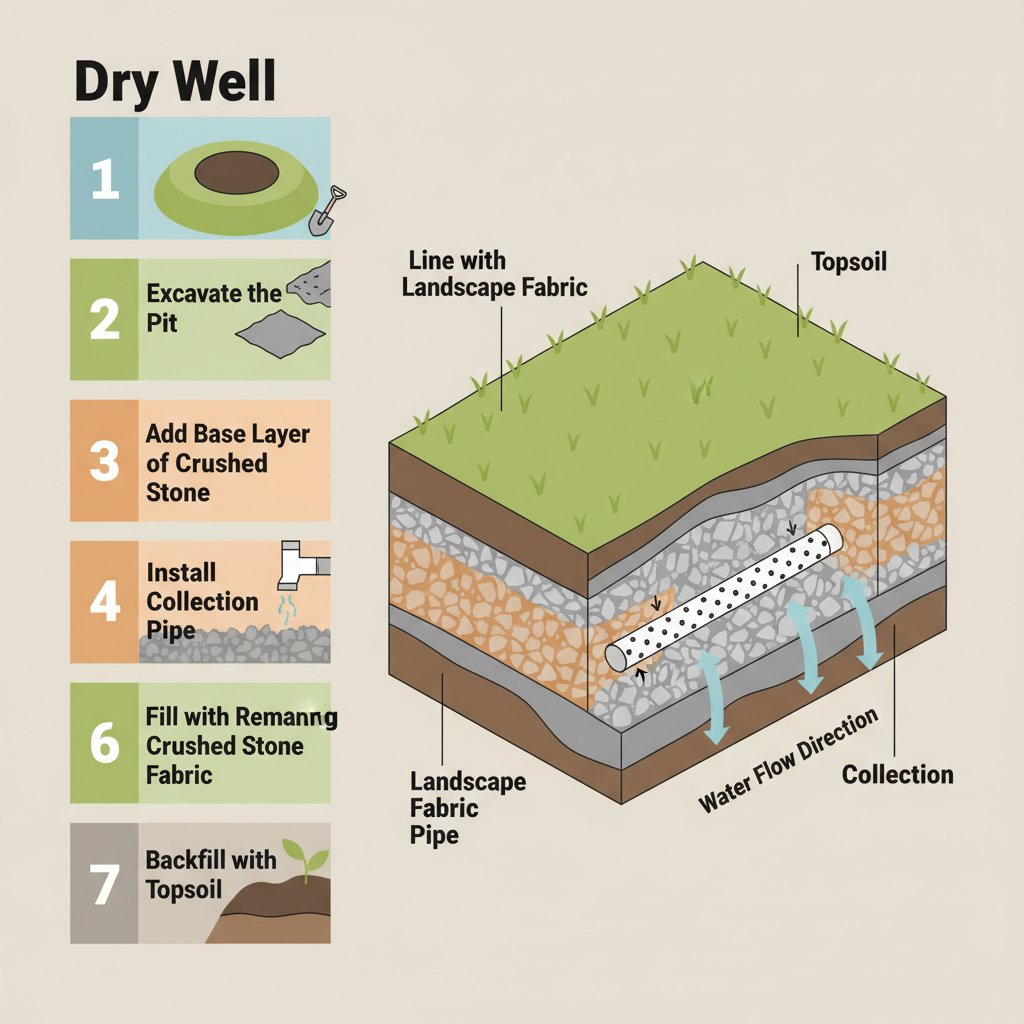
See How to Build a Dry Well
This visual guide walks you through the numbered steps for installing a dry well, showing exactly how to excavate, line, and fill the pit. It clarifies the crucial layer structure—from landscape fabric to crushed stone and collection pipe—so you can see how each component works together to manage water flow. Following this sequence ensures your dry well is built correctly and functions effectively.
Gravel for Dry Wells: Best Drain Rock, Depth, Size & Installation Guide
A dry well is an underground system that collects and disperses stormwater runoff using gravel or crushed stone. For optimal performance, we recommend 3/4 to 1 1/2 inch crushed stone installed at a depth of 12-18 inches. This angular stone creates stable voids for water storage while preventing compaction, ensuring long-term drainage efficiency. Proper sizing and installation prevent oversaturation while protecting your property from water damage.
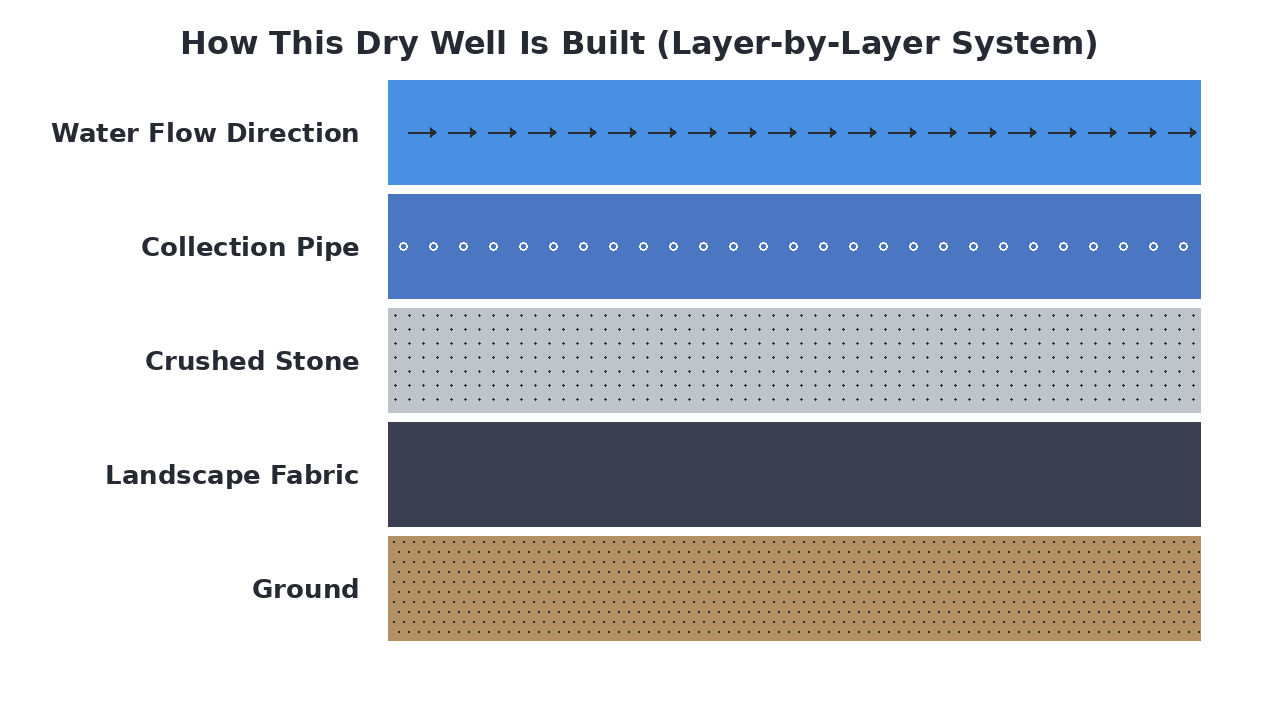
How This Dry Well Is Built (Layer-by-Layer System)
A dry well is an underground water management system designed to collect and slowly disperse stormwater runoff. It consists of a large excavated pit lined with landscape fabric and filled with gravel or crushed stone, which provides both structural support and water storage capacity. The system captures surface water through a collection pipe, allowing it to percolate through the gravel layer and gradually infiltrate into the surrounding soil. Proper sizing and placement ensure effective water absorption while preventing oversaturation of the area.
Materials Breakdown: What Each Layer Does
A dry well is constructed as a layered system designed to capture and slowly disperse stormwater into the surrounding soil. Each material serves a distinct purpose, from filtering out sediment to providing a reservoir for water storage. The layers work together to prevent surface flooding and protect the foundation by managing runoff effectively.
Native Soil
The existing earth into which the dry well is excavated; it receives the filtered water that percolates from the system.
Landscape Fabric
A geotextile liner that wraps the crushed stone to prevent soil from migrating in and clogging the drainage voids.
Crushed Stone
Clean, angular stone that creates a large storage reservoir for captured water and allows it to flow toward the collection pipe.
View Crushed Stone →Perforated Collection Pipe
A slotted pipe that directs incoming water from downspouts or drains into the center of the stone-filled dry well.
Inflow Path
The route water takes from the source (like a downspout) into the collection pipe and then throughout the stone reservoir.
What Is a Dry Well and Why Does It Matter?
A dry well is an underground water management system that collects stormwater runoff and allows it to slowly infiltrate into the surrounding soil. It matters because it prevents flooding, reduces erosion, and helps recharge groundwater while protecting your property's foundation and landscaping. Unlike surface drainage solutions like French drains, dry wells store and disperse water underground, making them ideal for areas with poor surface drainage or where above-ground water flow is undesirable.
Common Types of Dry Well Systems
Dry wells come in several common configurations based on their construction materials and installation methods. The simplest uses a large pit filled with gravel, while more advanced systems incorporate prefabricated plastic chambers or concrete structures. Each type varies in cost, installation complexity, and drainage capacity, with gravel-based systems being the most accessible for DIY projects.
- Most affordable DIY option
- Excellent natural filtration
- Easy to install and maintain
- Uses drainage rock layers
Best for: Homeowners on a budget
- Higher water storage capacity
- Professional installation required
- More expensive materials
- Long-lasting plastic construction
Best for: High-volume drainage needs
- Extremely durable structure
- Heavy equipment needed
- Permanent underground solution
- Highest cost option
Best for: Commercial or heavy-duty applications
When a Dry Well Is the Best Solution
A gravel-filled dry well is ideal when you need an affordable, effective solution for managing stormwater runoff around your home. Choose this option if you have moderate drainage issues, want a DIY-friendly project, or need to prevent foundation damage from water pooling. It works best in residential settings where underground water dispersal is preferable to surface drainage, and when budget constraints make prefabricated systems impractical.
Everything You Need to Build a Dry Well
Building a dry well requires a few key materials to create the layered drainage system. You'll need a perforated collection pipe, crushed stone for the main reservoir, and landscape fabric to separate soil from stone. Essential tools include digging equipment, a level for proper slope, and safety gear for the excavation work.
- Landscape fabric, Crushed stone, Perforated collection pipe
- Shovel, Wheelbarrow, Level, Safety gloves, Tape measure
- A contractor supply store (safety gear), Hello Gravel (materials), Local equipment rental (compactor if needed)
What to Consider Before You Start
Proper planning ensures your dry well functions effectively and avoids common installation pitfalls. Consider these key factors before starting your project.
- Local regulations and permits
Check with your municipality about any required permits for drainage system installation.
- Soil drainage capacity
Perform a percolation test to ensure your soil can absorb water at an adequate rate.
- Water flow direction
Identify the natural slope and determine where water currently flows during rain events.
- Collection pipe placement
Plan the pipe location and slope to ensure proper water flow into the dry well.
- Distance from structures
Ensure the dry well is located at least 10 feet from your home's foundation and other structures.
How to Prepare the Ground for a Dry Well
Begin by clearing the area of all vegetation, roots, and debris to create a clean worksite. Mark the dry well's perimeter and any trench lines for the inlet pipe, then grade the site to ensure a slight slope toward the well location for proper water flow. Compact the subsoil firmly to create a stable base that prevents settling and maintains the structure's integrity.
How a Dry Well Works
A dry well functions by collecting stormwater through an inlet pipe, which directs flow into a reservoir of crushed stone. This stone layer temporarily stores the water while allowing it to slowly percolate into the surrounding soil. The landscape fabric wrapping the excavation prevents soil intrusion, maintaining the stone's drainage capacity and protecting the system from clogging.
How to Install a Dry Well
Excavate the Pit
⚠️ Local stormwater rules apply: drainage and infiltration projects are subject to local rules about discharge location, setbacks, and (for larger systems) permits. The steps below are provided to help plan your aggregate order, not as a substitute for checking with your municipality and following local stormwater rules. Dig a hole to the required depth and dimensions, ensuring it is large enough to accommodate the planned stone volume and collection pipe.
Line with Landscape Fabric
Drape a layer of permeable landscape fabric over the entire excavation, leaving excess fabric to wrap over the top later.
Add Base Layer of Crushed Stone
Place a thick layer of clean crushed stone in the bottom of the pit to create a stable foundation and initial water storage reservoir.
Install Collection Pipe
Position the perforated collection pipe on top of the base stone layer, ensuring it slopes slightly toward the well for proper inflow.
Fill with Remaining Crushed Stone
Completely surround the pipe with additional crushed stone, filling the pit up to just below the ground surface.
Wrap & Cover with Fabric
Fold the excess landscape fabric over the top of the stone to fully encapsulate it, preventing soil from washing into the voids.
Backfill with Topsoil
Cover the wrapped dry well with a layer of topsoil, grading it to blend seamlessly with the surrounding landscape.
Alternative Gravel Options for Dry Wells
For a dry well's primary drainage layer, homeowners typically choose between several aggregate options based on size, angularity, and void space. Crushed stone is often the top recommendation because its angular edges lock together to prevent settling while maintaining excellent water storage and flow. Rounded materials like pea gravel can work but may compact over time, while sand is better suited for filtration layers rather than the main reservoir.
The angular shape creates stable voids for optimal water storage and drainage.
View Product →Specifically graded for maximum permeability and long-term structural integrity.
Rounded stones that allow water flow but can settle and reduce capacity over time.
View Product →Too fine for the main reservoir; best used only in filtration layers.
View Product →Common Dry Well Mistakes (And How to Avoid Them)
Proper dry well installation requires careful attention to several key details. Avoid these common pitfalls to ensure your system functions effectively for years.
- Insufficient depth
- Poor filtration layer
- Wrong aggregate size
- Inadequate overflow
- Clogged inlet
How to Maintain a Dry Well
Regular maintenance keeps your dry well functioning properly. Inspect the inlet screen seasonally and remove any debris that could cause clogs. Check the surface above the well for settling and add topsoil as needed to maintain proper grading. Every few years, consider having a professional inspect the reservoir layer for sediment accumulation that could reduce capacity.
Calculate How Much Gravel You Need
Enter Your Dimensions
Measure your project area and we'll calculate how much material you need.