Gravel for Fence Post Holes: #57 Stone Volume per Post
A sturdy fence begins with a properly installed post, ensuring your structure stands strong for years. This guide explains what a fence post is, which materials you need, how to prepare the ground, how to install a fence post step by step, and how to estimate the amount of gravel required. Whether you are building a new fence or replacing an old post, use the sections below to find what you need.
See How to Build a Fence Post
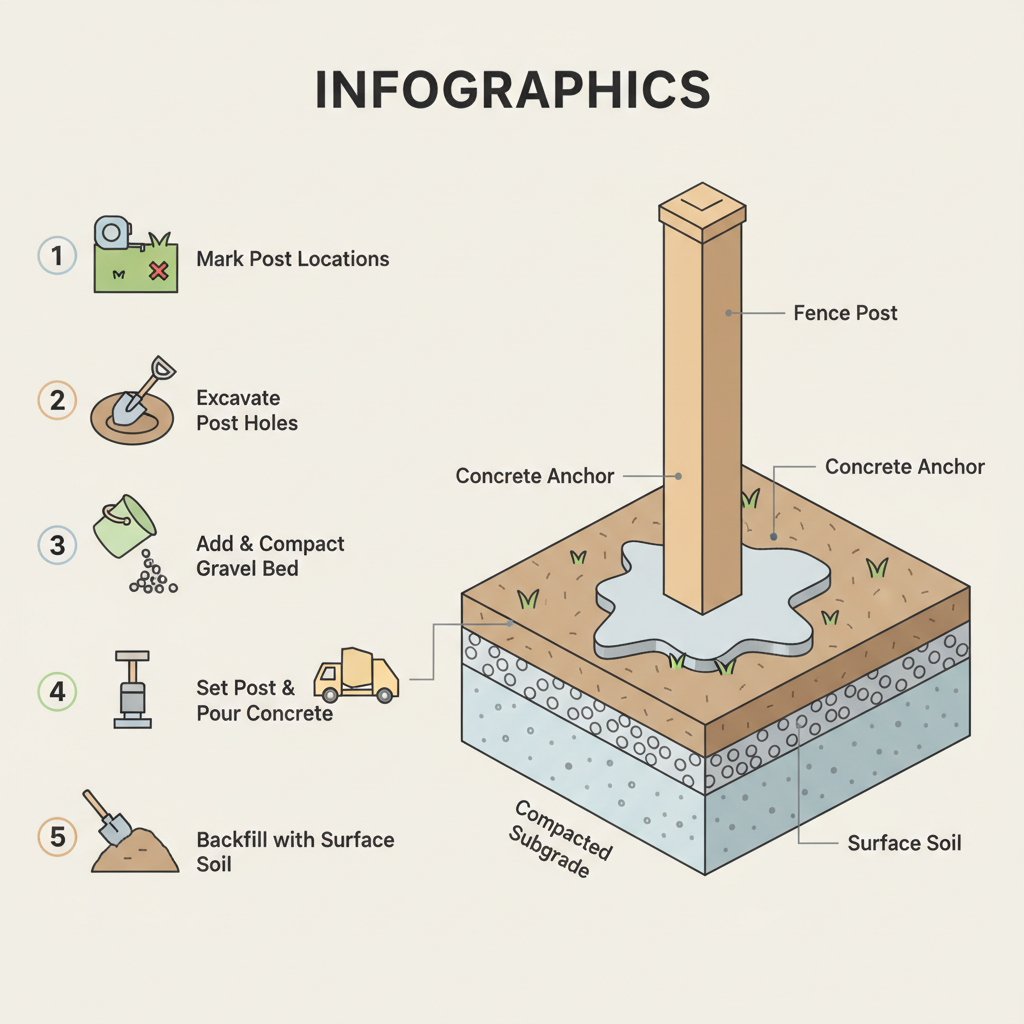
This visual guide illustrates the complete installation sequence for a sturdy fence post, from marking locations to final backfilling. It clarifies the critical layered structure—from compacted subgrade and gravel drainage bed to concrete anchor and surface soil—ensuring proper drainage and stability. Seeing each numbered step as a clear diagram helps you plan and execute the project with confidence.
Gravel for Fence Posts: Best Materials, Depth & Anchoring Guide
Proper fence post installation requires a gravel drainage bed to prevent water damage and ensure long-term stability. We recommend using 3/4 inch crushed stone at a depth of 6-8 inches beneath each post. This gravel base allows water to drain away from the post base, preventing rot and frost heave. Combined with a concrete anchor, this creates a durable foundation that resists movement and decay.
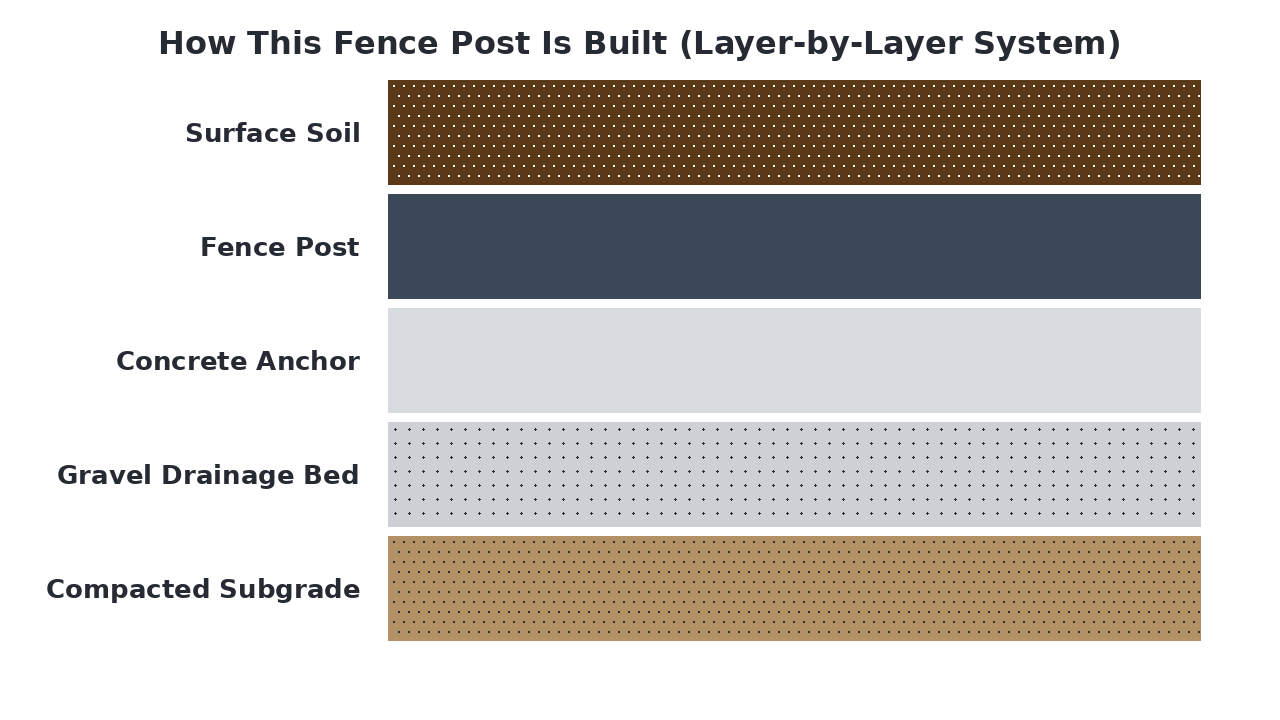
How This Fence Post Is Built (Layer-by-Layer System)
A fence post is anchored using a layered system that balances structural stability with proper drainage to prevent frost heave and rotting. The system begins with a compacted subgrade hole, followed by a gravel base layer that creates a drainage bed, then concrete poured around the post for a solid anchor. This combination allows water to drain away from the post base while providing a firm, long-lasting foundation that resists movement and decay.
Materials Breakdown: What Each Layer Does
A fence post is secured by a layered system that ensures stability, drainage, and durability. Each material serves a distinct purpose, from preventing frost heave to anchoring the post firmly. Together, these layers create a foundation that resists shifting and rot, extending the life of the fence.
Compacted Subgrade
The native soil at the bottom of the hole, compacted to provide a stable, level base that prevents settling and supports the layers above.
Crushed Stone
A layer of free-draining gravel that allows water to escape from around the post, preventing frost heave and reducing moisture that can cause rot.
View Crushed Stone →Concrete
A concrete collar poured around the post to anchor it firmly in place, providing the primary structural support and resistance to lateral forces.
View Concrete →Pressure-Treated Wood Post
The vertical post itself, typically made from pressure-treated lumber to resist decay and insects, forming the main structural member of the fence.
Topsoil
The final layer of soil backfilled around the base of the post to blend with the surrounding landscape and help direct surface water away.
View Topsoil →What Is a Fence Post and Why Does It Matter?
A fence post is a vertical support element that forms the structural backbone of any fence system, providing stability and defining boundaries. Proper installation matters because it prevents common issues like leaning, rotting, and frost damage that can compromise the entire fence structure. Unlike simply burying posts in soil, a gravel drainage bed with concrete anchoring creates a balanced system that manages water while providing solid support, significantly extending the fence's lifespan.
Common Types of Fence Post Systems
Fence post systems vary based on the material used to secure the post in the ground. The most common methods include setting posts directly in soil, using concrete for a rigid anchor, or creating a gravel drainage bed combined with concrete. Each approach offers different trade-offs in terms of stability, drainage, and resistance to frost heave and rot.
- Lowest upfront cost
- Quickest installation
- Poor drainage and stability
- Prone to rotting and leaning
Best for: Temporary fences or very dry climates
- Extremely rigid support
- Long-lasting stability
- Can trap water and cause rot
- Susceptible to frost heave damage
Best for: Heavy-duty fences in frost-free areas
- Excellent water drainage
- Reduces frost heave risk
- Prevents wood rot at base
- Combines drainage with solid support
Best for: Durable, long-lasting fences in most climates
When a Fence Post Is the Best Solution
A gravel drainage bed with concrete anchoring is the best solution when you need a fence that will last for decades, especially in regions with wet soil, freeze-thaw cycles, or heavy rainfall. This system manages water effectively to prevent rot and frost damage, making it ideal for both wooden and vinyl fences. It's a smart investment for homeowners who want to avoid future repairs and ensure their fence remains straight and stable over time.
Everything You Need to Build a Fence Post
To build a stable fence post foundation, you'll need materials for drainage, anchoring, and compaction. The essential tools include digging equipment, measuring tools, and mixing implements for concrete. Having the right supplies ensures proper installation that prevents frost heave and post movement over time.
- Gravel or crushed stone
- Concrete mix
- Sand
- Fence post
- Surface soil
- Post hole digger or auger
- Shovel
- Level
- Mixing tub or wheelbarrow
- Tamper or compactor
- Hello Gravel (materials)
- A contractor supply store
- local equipment rental (auger)
What to Consider Before You Start
Before digging your first post hole, consider these key planning factors to ensure a successful and durable fence installation.
-
Property lines and permits
Verify your property boundaries and check local regulations for fence height, setback requirements, and necessary permits.
-
Soil type and drainage
Assess your soil composition and drainage patterns to determine the appropriate depth and drainage bed thickness needed.
-
Post spacing and alignment
Plan the exact spacing between posts and establish a straight alignment using string lines and stakes before digging.
-
Utility line locations
Call 811 or your local utility locating service to identify underground lines before any excavation work.
-
Weather and timing
Check the weather forecast to avoid pouring concrete during rain or extreme temperatures that could affect curing.
How to Prepare the Ground for a Fence Post
Start by clearing the area of any vegetation, debris, or large rocks that could interfere with the post hole. Use stakes and string to mark the exact post locations and ensure they are aligned and spaced correctly. Grade the site to promote water runoff away from the post location, preventing pooling. Finally, compact the subgrade soil at the bottom of each hole to create a stable, level base for the drainage layer.
How a Fence Post Works
The fence post system transfers the fence's weight and lateral loads down through the concrete anchor into the compacted subgrade. A gravel drainage bed at the base allows water to percolate away from the post, preventing frost heave and wood rot. The concrete anchor encases the post's base, providing a rigid, permanent hold that resists shifting and uplift forces. This layered structure ensures long-term stability by managing both structural loads and groundwater.
How to Install a Fence Post
Mark Post Locations
Use stakes and string to mark the exact positions and alignment for all fence posts.
Excavate Post Holes
Dig holes to the required depth and diameter, typically three times the post width and below the frost line.
Add & Compact Gravel Bed
Pour a layer of gravel into the bottom of each hole and compact it to create a stable drainage base.
Set Post & Pour Concrete
Place the post in the hole, ensure it is plumb, then fill the hole with concrete to anchor the post.
Backfill with Surface Soil
Once the concrete has cured, backfill around the post with the excavated soil to grade level.
Alternative Gravel Options for Fence Posts
The optimal combination for most residential fences, providing drainage and permanent anchoring.
View Product →Maximum strength for heavy-duty applications but requires proper drainage planning.
Good drainage and stability for lighter fences in well-drained soils.
Provides drainage but lacks the compaction strength of crushed stone.
Poor choice for structural support as it doesn't compact well and shifts easily.
When securing fence posts, homeowners can choose from several aggregate options that provide different levels of stability, drainage, and ease of installation. Crushed stone offers excellent compaction and drainage, making it ideal for load-bearing applications, while concrete provides maximum strength but requires more labor. For most residential fence projects, a crushed stone base with concrete collar offers the best balance of durability, drainage, and ease of installation, which is why it's typically the recommended approach.
Common Fence Post Mistakes (And How to Avoid Them)
Proper fence post installation requires attention to several key details that homeowners often overlook. Avoiding these common mistakes will ensure your fence remains straight, stable, and durable for years to come.
- Insufficient depth
- Poor drainage planning
- Inadequate compaction
- Wrong aggregate choice
- No concrete collar
How to Maintain a Fence Post
Regular inspection of fence posts is essential for long-term stability. Check for signs of leaning or shifting, especially after heavy rains or freeze-thaw cycles. Replenish any washed-away gravel around the base and ensure drainage channels remain clear. For concrete collars, inspect for cracking and repair with fresh concrete as needed to maintain structural integrity.