How to harden gravel like concrete for driveways and patios
Get an estimate for your project in 60 seconds

You can transform loose gravel into a stable, concrete-like surface using binding agents and proper compaction. The process involves mixing Portland cement with sand and water, applying it to prepared gravel, then compacting and curing the surface. This method costs significantly less than pouring concrete while providing excellent durability for light-duty applications.
Pro tip: Crushed stone works better than pea gravel for hardening because its angular edges lock together more effectively during compaction.
If you’ve been frustrated with loose gravel that shifts underfoot or gets scattered by vehicles, hardening it offers a practical solution. This technique creates surfaces that resist erosion, support foot traffic, and maintain their shape through weather changes. According to hellogravel.com, hardened gravel works particularly well for garden paths, parking pads, and light-duty driveways.
Understanding the difference between gravel and concrete
Regular gravel consists of loose aggregate pieces that move independently. Concrete combines gravel with cement, sand, and water, where the cement undergoes hydration to bind everything into a solid mass. When you harden gravel, you’re essentially creating a simplified concrete by adding binding agents to existing loose aggregate.
The key difference lies in the binding process. Traditional concrete requires specific ratios and thorough mixing before placement. Hardening gravel allows you to work with material already in place, making it more suitable for DIY projects. However, hardened gravel won’t achieve the same structural strength as properly poured concrete. Understanding what type of gravel is best to use under a concrete slab can also help you make informed decisions about your project foundation.

Choosing the right materials for hardening
Your choice of gravel type significantly impacts the final result. hellogravel.com recommends crushed stone as the top choice because its angular shape allows pieces to interlock effectively. Road base, which contains a mix of stone sizes and fine particles, also compacts exceptionally well.
| Gravel Type | Compaction Quality | Best Use |
|---|---|---|
| Crushed Stone | Excellent | Driveways, foundations |
| Road Base | Excellent | Heavy-duty applications |
| Pea Gravel | Fair | Decorative paths |
| River Rock | Poor | Avoid for hardening |
Avoid rounded materials like river rock, as they don’t lock together during compaction. For binding agents, Portland cement mixed with sand provides the most reliable results. Polymeric sand works for lighter applications, while lime or fly ash offer specialized properties for specific conditions. If you’re working on a driveway project, consider exploring the best gravel for driveway options to ensure optimal results.
Step-by-step hardening process
Start by preparing your gravel surface thoroughly. Clear all debris and rake the area level, filling low spots and smoothing ridges. Aim for a compacted depth of 2 to 4 inches for optimal results. This preparation ensures even distribution of your binding agent. Learning how to level gravel properly is essential for achieving a professional finish.
Important: Work in small sections when applying binder, as cement sets quickly and becomes difficult to work with once it begins hardening.
Create your binding mixture by combining 1 part Portland cement with 2 parts sand, adding water gradually until you achieve a thick slurry consistency. Apply this mixture evenly across your prepared gravel using a trowel or spreader. Work the binder into the gravel surface, ensuring it penetrates between the aggregate pieces.
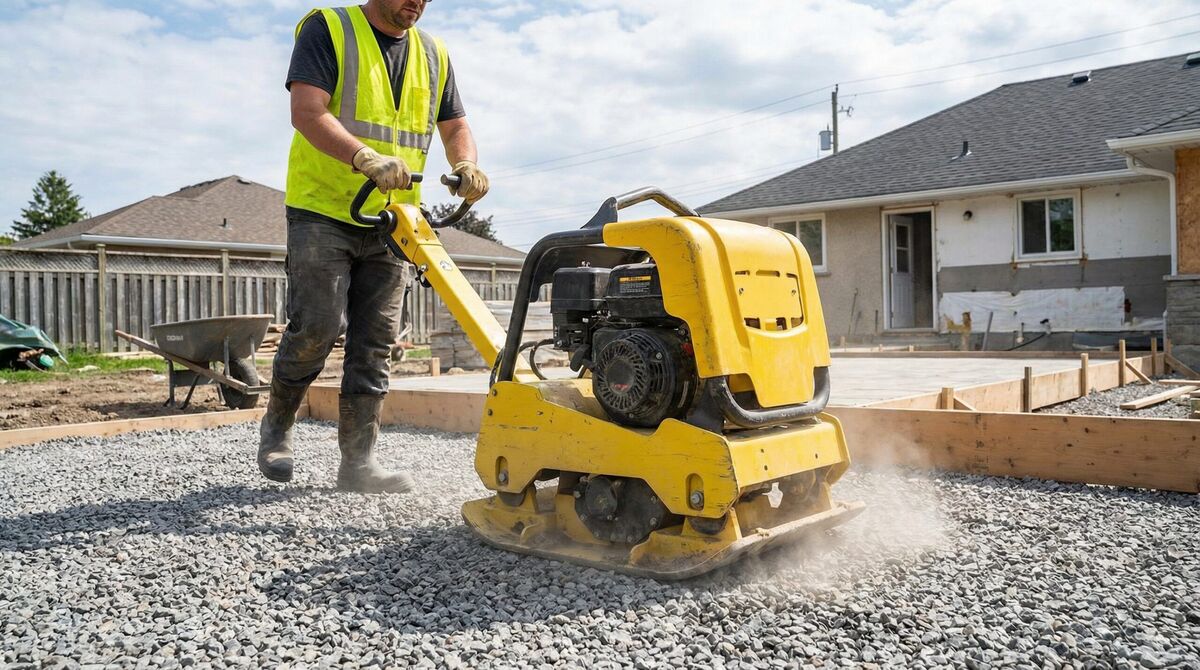
Compaction represents the most critical step in the process. Use a plate compactor or hand tamper to press the mixture firmly, eliminating air gaps and securing the gravel in place. Work systematically across the entire surface, overlapping your passes slightly. Light misting with water during compaction helps the curing process without washing away your binder.
Curing and maintenance considerations
Allow your hardened surface to cure for 24 to 48 hours before light use, keeping it slightly moist but not saturated. Full curing takes up to one week, during which you should avoid heavy traffic or equipment. Weather conditions affect curing time, with cooler temperatures extending the process.
According to housedigest.com, properly hardened gravel surfaces require minimal maintenance compared to loose aggregate. However, they may need refreshing every few years depending on traffic and weather exposure. You can extend surface life by applying gravel binding spray as needed. For ongoing maintenance, check out our guide on how to secure loose driveway gravel to keep your surface stable.
The hardened surface will resist erosion and maintain its shape through normal weather cycles. While it won’t match poured concrete in strength, it provides excellent performance for garden paths, parking areas, and light-duty driveways at a fraction of the cost. If you’re considering different materials, comparing the best size gravel for a driveway can help you choose the right option for your specific needs.
This method offers a practical middle ground between loose gravel and full concrete installation. With proper materials and technique, you can create a durable surface that serves your needs while staying within budget. The key lies in choosing angular aggregate, using quality binding agents, and following proper compaction procedures.


